Calculators are a common and useful tool in everyday life, and they can also be implemented in programming languages such as Java. In this article, we will discuss how to create a simple calculator using Java Swing, a popular graphical user interface (GUI) toolkit.
Java Swing is a collection of classes that provide a set of lightweight, platform-independent components for building graphical user interfaces (GUIs). It is part of the Java Foundation Classes (JFC) and includes a rich set of components for building user interfaces and adding interactive functionality to Java applications.
To create a calculator using Java Swing, we will need to first create a new project and add the necessary dependencies to our project. We will then create a new class for our calculator and add the necessary components to the user interface, such as text fields, buttons, and labels.
Next, we will implement the functionality of our calculator by adding event listeners to our buttons and writing the necessary code to perform the calculations when the buttons are clicked. This will involve using basic arithmetic operations, such as addition, subtraction, multiplication, and division, as well as handling any errors that may occur, such as dividing by zero.
Once we have implemented the basic functionality of our calculator, we can add additional features, such as the ability to perform more advanced calculations, such as square root, exponential, and trigonometric functions. We can also add formatting options, such as the ability to show or hide the decimal point, and add user-friendly features, such as a clear button and a backspace button.
Overall, creating a calculator using Java Swing is a simple and straightforward process that allows us to build a useful tool that can be used in a variety of applications. By leveraging the power of Java and the rich set of components provided by Swing, we can quickly and easily create a functional and user-friendly calculator.
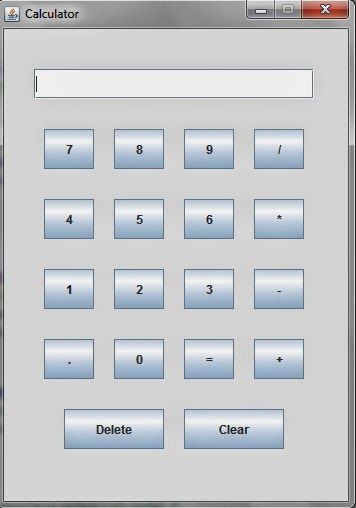
Output of Program:
  import javax.swing.*;

import java.awt.event.*;


class Calc implements ActionListener

{

JFrame f;

JTextField t;

JButton b1,b2,b3,b4,b5,b6,b7,b8,b9,b0,bdiv,bmul,bsub,badd,bdec,beq,bdel,bclr;


static double a=0,b=0,result=0;

static int operator=0;


Calc()

{

f=new JFrame("Calculator");

t=new JTextField();

b1=new JButton("1");

b2=new JButton("2");

b3=new JButton("3");

b4=new JButton("4");

b5=new JButton("5");

b6=new JButton("6");

b7=new JButton("7");

b8=new JButton("8");

b9=new JButton("9");

b0=new JButton("0");

bdiv=new JButton("/");

bmul=new JButton("*");

bsub=new JButton("-");

badd=new JButton("+");

bdec=new JButton(".");

beq=new JButton("=");

bdel=new JButton("Delete");

bclr=new JButton("Clear");

t.setBounds(30,40,280,30);

b7.setBounds(40,100,50,40);

b8.setBounds(110,100,50,40);

b9.setBounds(180,100,50,40);

bdiv.setBounds(250,100,50,40);

b4.setBounds(40,170,50,40);

b5.setBounds(110,170,50,40);

b6.setBounds(180,170,50,40);

bmul.setBounds(250,170,50,40);

b1.setBounds(40,240,50,40);

b2.setBounds(110,240,50,40);

b3.setBounds(180,240,50,40);

bsub.setBounds(250,240,50,40);

bdec.setBounds(40,310,50,40);

b0.setBounds(110,310,50,40);

beq.setBounds(180,310,50,40);

badd.setBounds(250,310,50,40);

bdel.setBounds(60,380,100,40);

bclr.setBounds(180,380,100,40);

f.add(t);

f.add(b7);

f.add(b8);

f.add(b9);

f.add(bdiv);

f.add(b4);

f.add(b5);

f.add(b6);

f.add(bmul);

f.add(b1);

f.add(b2);

f.add(b3);

f.add(bsub);

f.add(bdec);

f.add(b0);

f.add(beq);

f.add(badd);

f.add(bdel);

f.add(bclr);

f.setLayout(null);

f.setVisible(true);

f.setSize(350,500);

f.setDefaultCloseOperation(JFrame.EXIT_ON_CLOSE);

f.setResizable(false);

b1.addActionListener(this);

b2.addActionListener(this);

b3.addActionListener(this);

b4.addActionListener(this);

b5.addActionListener(this);

b6.addActionListener(this);

b7.addActionListener(this);

b8.addActionListener(this);

b9.addActionListener(this);

b0.addActionListener(this);

badd.addActionListener(this);

bdiv.addActionListener(this);

bmul.addActionListener(this);

bsub.addActionListener(this);

bdec.addActionListener(this);

beq.addActionListener(this);

bdel.addActionListener(this);

bclr.addActionListener(this);

}


public void actionPerformed(ActionEvent e)

{

if(e.getSource()==b1)

t.setText(t.getText().concat("1"));

if(e.getSource()==b2)

t.setText(t.getText().concat("2"));

if(e.getSource()==b3)

t.setText(t.getText().concat("3"));

if(e.getSource()==b4)

t.setText(t.getText().concat("4"));

if(e.getSource()==b5)

t.setText(t.getText().concat("5"));

if(e.getSource()==b6)

t.setText(t.getText().concat("6"));

if(e.getSource()==b7)

t.setText(t.getText().concat("7"));

if(e.getSource()==b8)

t.setText(t.getText().concat("8"));

if(e.getSource()==b9)

t.setText(t.getText().concat("9"));

if(e.getSource()==b0)

t.setText(t.getText().concat("0"));

if(e.getSource()==bdec)

t.setText(t.getText().concat("."));

if(e.getSource()==badd)

{

a=Double.parseDouble(t.getText());

operator=1;

t.setText("");

}

if(e.getSource()==bsub)

{

a=Double.parseDouble(t.getText());

operator=2;

t.setText("");

}

if(e.getSource()==bmul)

{

a=Double.parseDouble(t.getText());

operator=3;

t.setText("");

}

if(e.getSource()==bdiv)

{

a=Double.parseDouble(t.getText());

operator=4;

t.setText("");

}

if(e.getSource()==beq)

{

b=Double.parseDouble(t.getText());

switch(operator)

{

case 1: result=a+b;

break;

case 2: result=a-b;

break;

case 3: result=a*b;

break;

case 4: result=a/b;

break;

default: result=0;

}

t.setText(""+result);

}

if(e.getSource()==bclr)

t.setText("");

if(e.getSource()==bdel)

{

String s=t.getText();

t.setText("");

for(int i=0;i


Comments
Post a Comment